Void value not ignored as it ought to be arduino
Case sensitivity in c language tutorial
Always be the first to know when an interesting new project is introduced or if products are on offer at an unbeatable price! Here you can find our privacy policy.
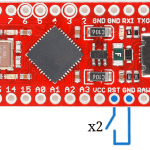
The most important information are the 13 digital pins that can be used as inputs and outputs. In addition, eight analog pins with analog-to-digital converter are available, which can also be used as digital pins. Communication with other devices or components is via I2C (A4 and A5), USART (D0 and D1) or SPI interface (D10, D11 and D12). Pins D2 and D3 can be used for external interrupts.
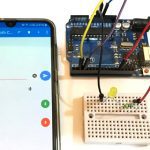
To test, upload the flashing example to the microcontroller (Sketch -> upload, or Ctrl + U). On the board there is an on-board LED, which should blink after successful upload (the LED is connected to Pin D13 by the way. The constant LED_BUILTIN refers to this pin).
The outer potentiometer connections are connected to 5V and GND, the middle contact (grinder) to A0. This is how it is defined in the Ketch example. The ledPin 13 is (as mentioned above) the contact to the on-board LED. If you run the program on the Nano, you can use the potentiometer to adjust the Pause to switch between on and off, increasing or decreasing the flashing pauses.
Exercises c++ ii how to print only with two decimal places of
Then, I made the modification of putting an else and an if independent to each servo and it is still the same (only Servo1 works). This makes me think that, as you mentioned, there is a 6 seconds delay (which is necessary for the physical application of the project) so probably a multitasking library would be needed, I saw something about that, but I was trying to make it work first.
Note: I also tried to treat first one sensor and then the other (first pulse and tone of A and then pulse and tone of B) but this makes them ignore both if and activate the servos alternately, again, I don’t know why.
This makes me think that, as you mentioned, there is a 6 second delay (which is necessary for the physical implementation of the project) so you would probably need a multitasking library, I saw something about that, but I was trying to get it to work first.
The delay is for the beginner because it stops the whole program flow without doing anything. The mic crosses its arms for the time you tell it to. It can be used… yes, but when it is fast… and not repetitive. Because using something short and repetitive has the same effect as something long and simple.
Comparing strings – 43. programming in c++
If you could help me to solve this detail, in such a way, to obtain a synchronization in the reading of the sensors and in such a way, to see a comparison in the serial plotter (graph) and in the serial monitor (value of the reading).
I am trying to give different order to the programming and to observe at the time of compiling, if there was a change in the behavior that I have in the sensors, that is to say I want to obtain the comparison that when both arrive to a certain value, the buzzer is put in high, only that one will be shown in the serial plotter and the other sensor in the serial monitor.
My other doubt is, how else can I do this programming for the opposite case, without using both if in the void loop, I don’t know for example to use, an else, if else, a for loop, any of those that could be applicable.
C++ – read from a file
comment * /Record.Formatting.There is the formatting (alignment) of the code, i.e. respect spaces and spacing. For example, compare these two codes.Which one looks more clear and visual.Code formatting in arduino IdeNo issues, all serious IDEs have automatic code formatting, it works both in writing and guard process. Arduino IDE – is no exception, it has code formatting and hot key combinations Ctrl + T.Variable names.Code structure.Before turning to the structure and order of the pieces of code, there are a few things to remember:When you start the Arduino IDE, it gives us a blank space in the form of two required functions: setup() and loop().The code in setup() block is executed once every time you start the microcontroller. The code in the loop() block is performed «in a circle» during the entire operation of the microcontroller, starting from the time of completion of setup().For the curious: if you are already familiar with the C++ language, you are probably wondering «where is int main() and usually the main.cpp file?». Everything is very simple: int main() have already written for you inside the main.cpp file, which is located deep in the Arduino files.// main.cpp